Homemade Marshmallow S'mores
Category
DessertAuthor
Tiffany Hill
Servings
24 S'mores
Here’s what you’ll need:
Current Packaging Video for reference
Slim boutique boxes lined with greaseproof paper plus sticker/wrap.. Note: I trim stacks of my greaseproof papers to fit these boxes using this paper cutter. Paper is cut to 5.25 x 6.75 inches.
Two 8 x 8 baking pans (I use a silicone pan but any 8 x 8 pan will work).
Optional: Kitchen scale for weighing marshmallow batter.
Suggested Selling Price: $8-$10.
Note: If you need specific products I used for a current social media video, please go to this link.

Ingredients
Marshmallow Base
-
2 tbsp plus 1 1/2 tsp gelatin
-
1 1/2 cup sugar (300 g)
-
1 cup light corn syrup (320 g)
- 1 tbsp vanilla extract
-
1 cup water (240 g)
Dusting Powder
-
1/4 cup confectioner's sugar (30 g)
-
1/4 cup cornstarch (30 g)
S’mores Ingredients
-
(24) standard graham crackers (broken in half)
-
(12) 1.55 oz. Hershey Bars (broken in half)
-
Mini marshmallows for packing
Directions
Step One: Make the Marshmallows
Grease two 8 X 8 pans heavily using canola oil (I use a silicone brush to slather it on). Set aside.
Note: Any 8 x 8 pan will work. If using a non-silicone pan, line with parchment paper and generously coat the parchment with canola oil.
Add 1/2 cup (120g) water to a stand mixer fitted with the whisk attachment. Sprinkle gelatin evenly over the surface and allow it to bloom.
In a saucepan, combine 1 1/2 cups (300g) sugar, 1 cup (320g) light corn syrup, and 1/2 cup (120g) water. Stir just until combined.
Attach a candy thermometer and cook over medium-high heat until the mixture reaches 240–245°F (soft ball stage). Do not stir while cooking.
Once the sugar mixture reaches temperature, remove from heat, and turn the mixer to medium speed to begin loosening the gelatin.
Carefully and slowly pour the hot sugar mixture into the gelatin mixture while the mixer is running. Avoid splashing.
Add 1 tbsp (13g) vanilla extract.
Increase speed to medium-high and whip for 10–12 minutes, until the mixture becomes thick, glossy, and fluffy, and has cooled slightly. Do not overmix, as it can become tough.
Using a greased silicone spatula, divide and transfer the marshmallow mixture into the prepared pans and spread evenly.
Lightly grease a piece of parchment paper and place it over the top of each pan. Let set for at least 3–4 hours, preferably overnight. You can speed this process up by p
Each pan should have approximately 450 grams of marshmallow batter.
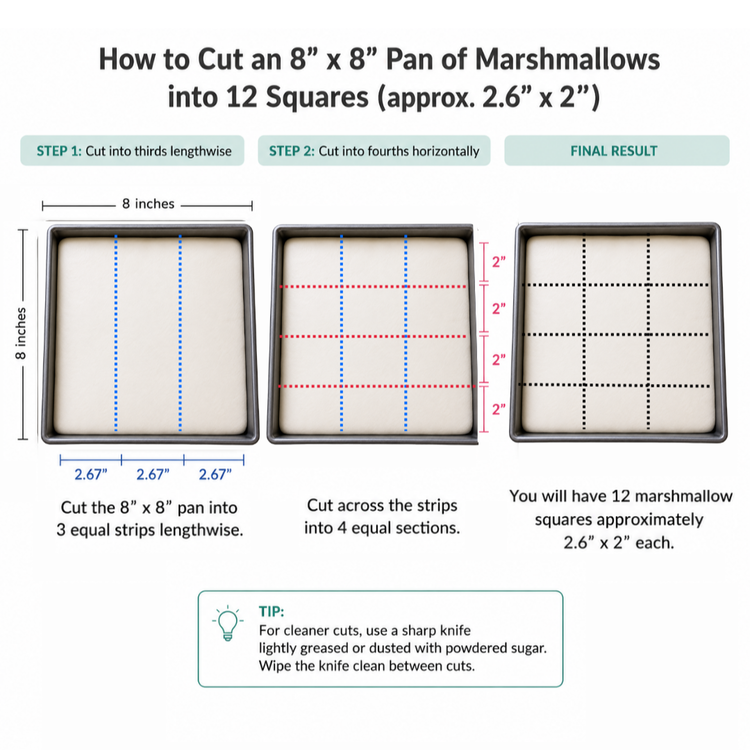
Cut Your Marshmallows
Once set, use a greased knife to cut into 12 pieces.
Toss each marshmallow in a 50/50 mixture of cornstarch and confectioners’ sugar (about 30g each) to coat.
Note: Coating the marshmallows well is essential to prevent them from sticking to the graham crackers and chocolate once packaged. After stacking the s’mores, you can gently dust off any excess coating around the edges if desired.
Assemble Your S’mores
Carefully break (24) full graham cracker in half.
Carefully break (12) full-size Hershey bars in half.
To assemble, start with one graham cracker half, then add one marshmallow, one Hershey bar half, and finish with another graham cracker half.
Repeat this process until you have (24) S’mores.
Package Your S’mores
Place (4) S’mores into a Slim Boutique Box.
Use mini marshmallows to fill any empty space around the s’mores and help keep them standing upright inside the box.
Finish your packaging with an optional mini wrap/sticker.
Recipe Note
Note from Tiffany:
Bakers, plain homemade marshmallows last a very long time. When stored properly (airtight, cool, dry), they can stay good for 1–2 weeks, sometimes even longer. The high sugar content acts as a preservative!
Marshmallows also freeze beautifully. For best results, place the marshmallows into an airtight container or freezer-safe bag and freeze for up to 2 months. If stacking, place parchment paper between layers to prevent sticking. When ready to use, allow the marshmallows to come to room temperature before assembling your s'mores.